Borders and Shading for Word Table
|
|
|
|
|
|
|
|
|
|
|
|
|
|
Borders and Shading for Word Table
Additional Resources
Borders and Shading for Word Table
Borders and Shading for Word Table |
 |
After you enter the text, put the rows and columns in place, and make them the right size, the fun begins. Now you can dress up your table and make it look snazzy.
Almost everything you can do to a document you can do to a table by selecting parts of it and choosing menu commands or clicking buttons. You can change text fonts, align data in the cells in different ways, and even import a graphic into a cell.
You can also play with the borders that divided the rows and columns and shade columns, rows, and cells by filling them with gray shades or a black background, read on to find out how to do these tricks and also how to center a table or align it with the right page margin.
|
|
What's on this page... Formatting a Table with AutoFormat Adding your own Borders Adding your own Shading & Color |
Formatting A Table With AutoFormat
The fastest way to get borders and shading for Word table is to let Word do the work for you by using the AutoFormats provided by Word.This makes it a lot quicker to add borders and shading instantly to your table.
To format a table using AutoFormat, follow these steps:
| 1. | Click anywhere inside your table. | ||
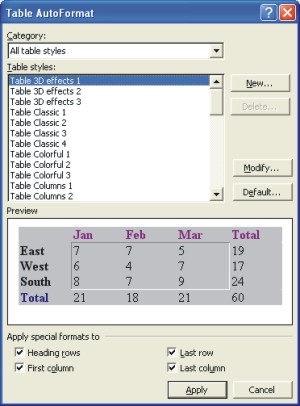
| 2. | Choose Table ► Table AutoFormat, or click the Table AutoFormat button on the Table and Borders toolbar. The Table AutoFormat dialog box appears. | ||
|
|
|||
|
|||
| 3. | Rummage through the Table Styles list until you find a table to your liking. You can see what tables look like in the Preview box. | ||
| 4. | Check and uncheck the Apply Special Formats To check boxes. As you do so, watch the Preview box to see what your choices do. | ||
| 5. | When you are satisfied with the right table format, click OK. | ||
 |
Q: How do I
get my table back to normal? If you have chosen an AutoFormat that you don't like, but you've done this quite a few steps ago. Go to the Table AutoFormat dialog box. From the Table Styles list, select Table Grid. This will return your table's formatting back to normal. |
| Back to Top |
| see also... |
| Add Borders | Add Shading & Color |
| and... |
| Text in Word Table |
| Sort a Word Table |
| Word Tables |
| Return to Microsoft Word XP from Borders and Shading for Word Table |
Microsoft Word XP
Q & A
Antonyms
AutoCorrect
AutoShapes & Text Boxes
Bookmarks
Borders
Bullets
Change Case
ClipArt
Columns
Convert PDF to Word
Convert Word to HTML
Convert Word to PDF
Customize Menus
Customize Shortcut keys
Customize Toolbars
Delete a File
Delete Text
Download Borders
Download Fonts
Drop Cap
Envelopes
Find & Replace
Fonts
Footers
Format Painter
Headers
Highlight Text
Indent
Labels
Line Spacing
Macros
Mail Merge
Margins
Move or Copy
Numbering
Open a File
Outline Numbering
Page Numbers
Page Orientation
Page/Section Break
Password
PDF to Word Converter
Print Preview
Rename a File
Save a File
Screen Layout
Selecting Text
Special Characters
Spelling & Grammar
Styles
Symbols
Synonyms
Tables
Tabs
Text Wrap
Thesaurus
Undo
Word Counter
Word to HTML Converter
Word to PDF Converter
WordArt
Zoom
