Microsoft Word 2007
|
|
|
|
|
|
|
|
|
|
|
|
|
|
Additional Resources
Microsoft Word 2007 - Headers & Footers
|
 |
|
|
What's on this page... Inserting Headers & Footers Removing Headers & Footers Inserting Different Headers & Footers |
Inserting Different Headers & Footers
You can have different headers of footers in one document. Usually, in writing a book with different chapters, you'll have different headers & footers for each chapter.The trick is to insert Section Breaks instead of Page Breaks.
To insert different headers of footers in the same document, follow these steps:
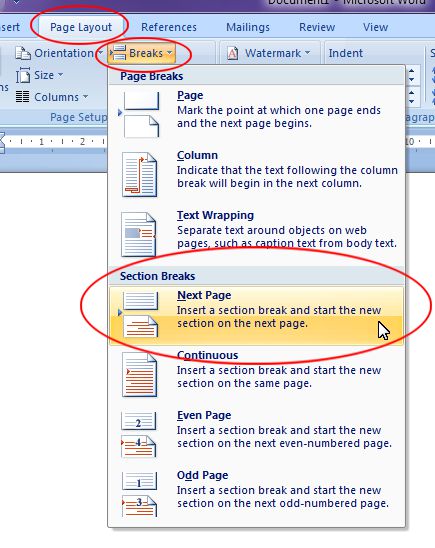
| 1. | When you have to insert the next page, but the header or footer needs to be different than the previous one, from the Page Layout Ribbon tab, click Breaks and choose Next Page. | ||
 |
|||
|
|||
| 4. | Now you can continue typing your document as usual, even finish it as you want. Just remember to insert Section Breaks into your document as the header or footer needs to be different for those pages. | ||
| 5. | To insert your header or footer, choose Insert Ribbon tab ► Header/Footer ► Edit Header/Edit Footer. | ||
| 6. | You'll notice the words "Header - Section 1" is
displayed at the top left of the Header area. And the words "Footer
- Section 1" at the bottom left of the Footer area. Enter the content of your header and footer for the first section of your document. |
||
| Example of what the Section 1 Header & Footer will look like. | |||
  |
|||
| 7. | As you scroll down to the next pages, you'll see in the next
section it will read "Header - Section 2" and "Footer
- Section 2". |
||
| Example of what the Section 2 Header & Footer will look like. | |||
  |
|||
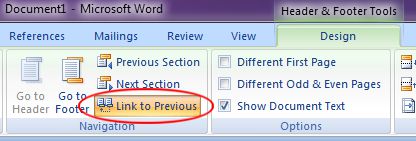
| Click the Link to Previous button to NOT have this section header or footer the same as the previous one. The words "Same as Previous" will disappears from the top right corner of the header and bottom right corner of the footer section, where your cursor are. | |||
 |
|||
| 8. | Enter some different content for this sections' header or footer and the previous or next header or footer will be left untouched! | ||
| 9. | Once you're done, click the Close Header and Footer button from the Design Ribbon tab. | ||
| See also... Insert Headers & Footers |
| Back to Top |
| Return to Microsoft Word 2007 from Microsoft Word 2007 - Headers & Footers |
Microsoft Word 2007
TOPICS
- On-screen elements
- Save a file
- Open a file
- Rename a file
- Delete a file
- Select
- Undo/Redo
- Deleting
- Copy
- Move
- Format Painter
- Font Attributes
- Font Dialog Box
- Alignment
- Highlight text
- Character Spacing
- Indent
- Line Spacing
- Change Case
- Symbols
- Borders & Shading
- Download Borders
- Page Break
- Section Break
- Header
- Footer
- Page Number
- Margins
- Landscape/Portrait
- Vertical Alignment
- Paper Size
- Print
- Print Preview
- Thesaurus
- Spelling & Grammar
- AutoCorrect