Microsoft Word 2007
|
|
|
|
|
|
|
|
|
|
|
|
|
|
Additional Resources
Microsoft Word 2007 - Headers & Footers |
 |
|
|
What's on this page... Inserting Headers & Footers Removing Headers & Footers Inserting Different Headers & Footers |
Inserting Headers & Footers
A header is a little description that appears along the top of a page, on every page of the Microsoft Word 2007 document, so that the reader knows what's what. Usually, headers includes the page number and a title.A footer is the same thing as a header, except it appears along the bottom of the page, as befits its name.
To insert a header or footer into a document, follow these steps:
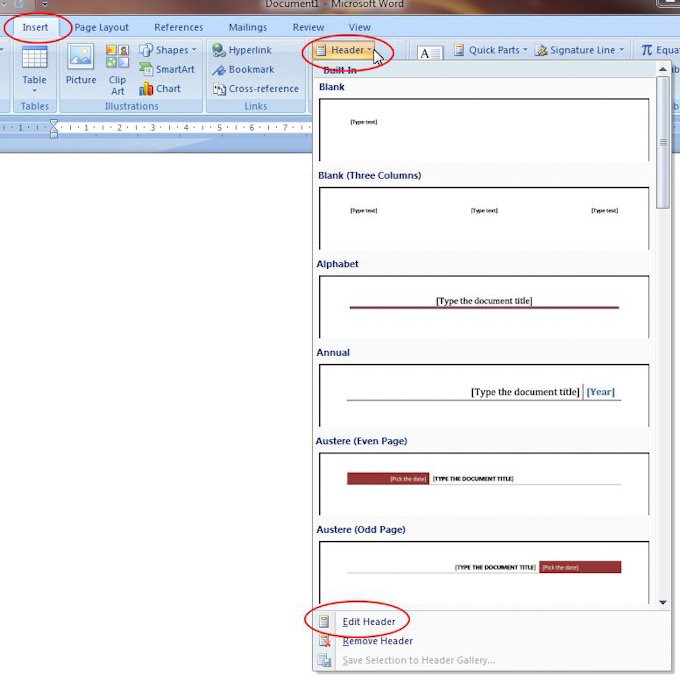
| 1. | Choose the Insert Ribbon tab. | ||
| 2. | Click the Header button, to insert a header, or click
the Footer button to insert a footer. From the drop-down list choose an option that suits your needs, or click on Edit Header to type your own content for the Header. OR Click on Edit Footer to type your own content for the Footer. |
||
 |
|||
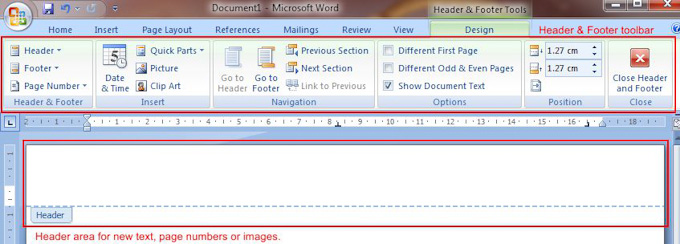
| A dotted area opens up
at the top of your document page with a name tag that says
"Header". A new toolbar ― Header & Footer Tools with an added Ribbon tab : Design ― appears at the top of the screen. |
|||
 |
|||
| 3. | Type your header in the box or click on Go to Footer to switch to your footer area and insert your content for your footer. | ||
|
|||
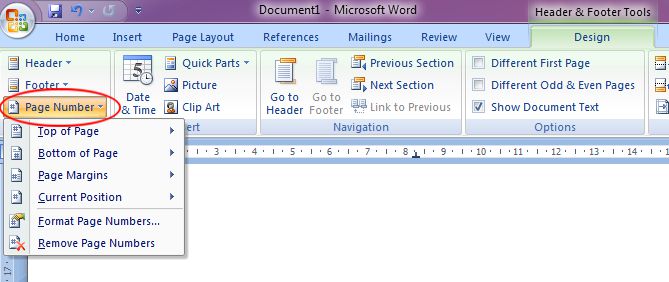
| 4. | To insert page numbers with your header and footer, click the Page Number button from the Design Ribbon tab. | ||
 |
|||
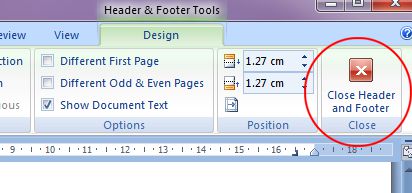
| 5. | Once you're done, click the Close Header and Footer button from the Design Ribbon tab. | ||
 |
|||
 |
Q: Why is my Header and Footer grey or "faded" out? Don't get scared now! This is Microsoft Word 2007's way of showing you that this is the header and this is the footer. You can double-click in the grey header or footer to go back into Header & Footer mode. To see how the finished header and footer fits with the rest of your document, click on the Office button, point to the arrow next to Print, and click on Print Preview to get a good overview! |
While you're busy with your header or footer you can also take advantage of the buttons on the Header & Footer tools: Design Ribbon tab.
Have a look at what they do as listed below.
Option Group |
What it does... |
 |
Header: Click to open the header
area. Footer: Click to open the footer area. Page Number: Click and select a page number position from the drop-down list to insert. |
 |
Date & Time: Click to choose
from a list of different date & time formats to insert the
current date & time. Quick Parts: Click to insert the different document properties, a field or building blocks. Picture: Click to insert a Picture that's save on your hard disk. Clip Art: Click to insert a clip art image. |
 |
Go to Header: Click Go to Header if you are in
your footer and want to switch to your Header. Go to Footer: Click Go to Footer if you are in your header and want to switch to your Footer. If your document is broken up into Section Breaks, then... Previous Section: Click this button to go to the previous section in your document. Next Section: Click this button to go to the next section in your document. Link to Previous: This allows you to link different sections of the document to each other. This means that the changes made in one section will also be done in the linked section. Once linked, a tab to the right of the header or footer will say "Same as Previous", to remove this click on Link to Previous to remove the header or footer being linked to the previous one. |
 |
Different First Page: Check mark
this option to have a different header or footer only on the first
page, like the index on the first page of a book. Different Odd & Even Pages: Check mark this option to have different headers or footers on all your odd and even pages, like a book that as mirroring headers and footers. Show Document Text: Check mark this option to have Word show the text on the document with the Header & Footer, or not. |
 |
Header position from Top: Change
the size of the space from the edge of the page to where the
header starts. Footer position from Bottom: Change the size of the space from the edge of the page to where the footer starts. Insert Alignment tab: This allows you to insert tabs with dot leaders into your header or footer. |
 |
This button allows you to exit the Header and Footer area and return to your normal document view. |
Removing Headers & Footers
You might have inserted a header or footer content which you want to remove from your document.If your document has the same header or footer on all the pages, removing the header or footer from one of the pages will remove it automatically from all of them.
To remove a header or footer, follow these steps:
| From the Insert Ribbon tab click on Header (or Footer) and choose Remove Header (or Remove Footer). | |
| In Microsoft Word 2007, you can also double-click the header or footer to edit them or delete the text or elements in them. | |
| See also... Insert Different Headers & Footers |
| Back to Top |
| Return to Microsoft Word 2007 from Microsoft Word 2007 - Headers & Footers |
Microsoft Word 2007
TOPICS
- On-screen elements
- Save a file
- Open a file
- Rename a file
- Delete a file
- Select
- Undo/Redo
- Deleting
- Copy
- Move
- Format Painter
- Font Attributes
- Font Dialog Box
- Alignment
- Highlight text
- Character Spacing
- Indent
- Line Spacing
- Change Case
- Symbols
- Borders & Shading
- Download Borders
- Page Break
- Section Break
- Header
- Footer
- Page Number
- Margins
- Landscape/Portrait
- Vertical Alignment
- Paper Size
- Print
- Print Preview
- Thesaurus
- Spelling & Grammar
- AutoCorrect