Microsoft Word 2007
|
|
|
|
|
|
|
|
|
|
|
|
|
|
Additional Resources
Microsoft Word 2007 - Print Preview |
 |
|
|
What's on this page... To Print Preview a Document To Print a Document |
Print Preview Document
Once you're done with you document, you might have to print it. But you would surely like to see exactly what it will look like before you waste the office's ink.Before you print a document, check it first in Print Preview, and make sure that it looks the way you want it to.
To Print Preview a document, follow these steps:
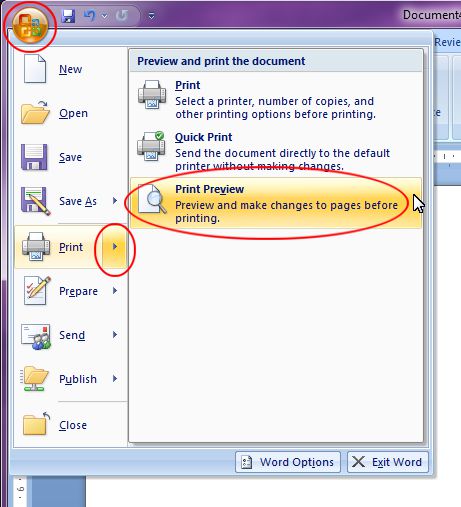
| 1. | Click the Office button at the top-left corner of the screen. |
|
|
|
| 2. | Point to the arrow next to Print and click on Print Preview from the expanded menu. |
 |
|
| Your document is displayed in Print Preview with a new toolbar at hand. | |
 |
|
| 3. | From the Page Setup option group you can change the margins, orientation and paper size as needed. Since you are in Print Preview you can see exactly how your changes will affect the document before it's printed. |
| 4. | In Print Preview you can use the Zoom options to view your document pages better. |
| 5. | Remove or add the checkmark to Show Ruler. |
| 6. | You'll notice that your mouse pointer is a small magnifying glass. This allows you to zoom in or out with the mouse. If you want to have the normal mouse pointer, click on the check box next to Magnifier to return your mouse to its old self. |
| 7. | If you want to make the document smaller by just one page, click on Shrink One Page to tell Word to change the line spacing or font size so that the whole document will be one page less. |
| 8. | Once your happy with what you see, you can click on the Print button. If you want to exit the Print Preview without wanting to print, then click on the Close Print Preview button. |
|
|
You can do almost anything in Print
Preview that you can in Print Layout view. The trick is to deselect the Magnifier and then select your text and right-click on it to expose the hidden menu with most of the options available. |
| See also... Print |
| Back to Top |
| Return to Microsoft Word 2007 from Microsoft Word 2007 - Print Preview |
Microsoft Word 2007
TOPICS
- On-screen elements
- Save a file
- Open a file
- Rename a file
- Delete a file
- Select
- Undo/Redo
- Deleting
- Copy
- Move
- Format Painter
- Font Attributes
- Font Dialog Box
- Alignment
- Highlight text
- Character Spacing
- Indent
- Line Spacing
- Change Case
- Symbols
- Borders & Shading
- Download Borders
- Page Break
- Section Break
- Header
- Footer
- Page Number
- Margins
- Landscape/Portrait
- Vertical Alignment
- Paper Size
- Print
- Print Preview
- Thesaurus
- Spelling & Grammar
- AutoCorrect