Microsoft Word ClipArt
|
|
|
|
|
|
|
|
|
|
|
|
|
|
Additional Resources
Microsoft Word ClipArt for Word XP
|
 |
Learn step-by-step how to insert Microsoft Word ClipArt into a document. Learn how to manipulate ClipArt and download new ClipArt images to use.
Once every often you would like to dress up your document with an image or two. Using Clip Art pictures in Word is very easily accomplished. You can even modify or adjust the image to suit your needs.
|
|
What's on this page... Inserting a Clip Art Image Download Pictures from the Internet Resize your Microsoft Word ClipArt Moving a Word Clip Art Picture Change the Picture's Color, Contrast & Brightness Cropping Parts of a Microsoft Word Clip Art Picture Rotating a Picture |
Moving a Microsoft Word Clip Art Picture
You can move your ClipArt picture to anywhere on your document, just choose your spot!
 |
Q: Why can't
I drag my ClipArt picture to anywhere on the document page? At default, the ClipArt picture are treated as a character in a Word document. You need to change the Text Wrapping of the ClipArt object to have it as a separate object on your document page. |
To change a Microsoft Word ClipArt picture's Text Wrapping, follow these steps:
| 1. | Click on the Microsoft Word ClipArt object once. When you see the 8 selection-handles, you'll know it's selected. The Picture toolbar also appears on your document. |
||||
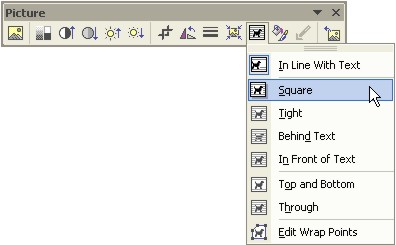
| 2. | From the Picture toolbar, click the
Text Wrapping button (a black dog with lines
through it). Choose
any of the options given. NOTE: The option "In line with Text" is the one that makes the ClipArt picture a character in the document. |
||||
|
|||||
| 3. | Once you've chosen another Text Wrapping option (I use "In
Front of Text" most of the time), you'll see
your resize-handles changes to white squares. Also added is a green circle at the top-center for Rotation. You can click-and-drag this green circle to see what it does! |
||||
|
|||||
| To move the Microsoft Word ClipArt picture to anywhere on the document, just
place your mouse-pointer on the object. The mouse pointer gets a double-headed arrow cross added to it. Click-and-drag to move the Microsoft Word ClipArt picture. |
|||||
|
|
Once you have added a different
Text Wrapping to a picture, you can also add a border to an image. Click the Line Style button and select a line style to add.  |
Microsoft Word XP
Q & A
Antonyms
AutoCorrect
AutoShapes & Text Boxes
Bookmarks
Borders
Bullets
Change Case
ClipArt
Columns
Convert PDF to Word
Convert Word to HTML
Convert Word to PDF
Customize Menus
Customize Shortcut keys
Customize Toolbars
Delete a File
Delete Text
Download Borders
Download Fonts
Drop Cap
Envelopes
Find & Replace
Fonts
Footers
Format Painter
Headers
Highlight Text
Indent
Labels
Line Spacing
Macros
Mail Merge
Margins
Move or Copy
Numbering
Open a File
Outline Numbering
Page Numbers
Page Orientation
Page/Section Break
Password
PDF to Word Converter
Print Preview
Rename a File
Save a File
Screen Layout
Selecting Text
Special Characters
Spelling & Grammar
Styles
Symbols
Synonyms
Tables
Tabs
Text Wrap
Thesaurus
Undo
Word Counter
Word to HTML Converter
Word to PDF Converter
WordArt
Zoom

