Microsoft Word ClipArt
|
|
|
|
|
|
|
|
|
|
|
|
|
|
Microsoft Word ClipArt
Additional Resources
Microsoft Word ClipArt
Microsoft Word ClipArt
Microsoft Word ClipArt for Word XP |
 |
Learn step-by-step how to insert Microsoft Word ClipArt into a document. Learn how to manipulate ClipArt and download new ClipArt images to use.
Once every often you would like to dress up your document with an image or two. Using Clip Art pictures in Word is very easily accomplished. You can even modify or adjust the image to suit your needs.
|
|
What's on this page... Inserting a Clip Art Image Download Pictures from the Internet Resize your Microsoft Word ClipArt Moving a Word Clip Art Picture Change the Picture's Color, Contrast & Brightness Cropping Parts of a Microsoft Word Clip Art Picture Rotating a Picture |
Inserting a Clip Art Image
Inserting Microsoft Word clip art sounds easy, but I think Microsoft made it a bit too complicated. Still, it isn't that difficult to do!Once you've done the necessary steps, you can just click-and-drag to insert clip art.
To insert a Microsoft Word ClipArt image, follow these steps:
| 1. | Place the cursor at the position where you want to insert your ClipArt. | ||
|
|||
| 2. | Click the Insert ClipArt button on the Drawing toolbar or choose Insert ►Picture ►ClipArt from the menu bar. | ||
|
|
|||
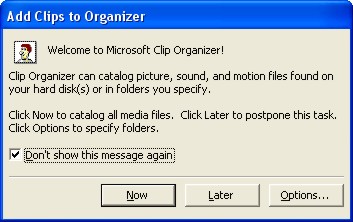
| 3. | If this is the first time you go to Insert Clip Art, you'll
see the Add Clips to Organizer dialog box. Check mark the option "Don't show this message again". (You can return to this window at a later stage!) Click Later, to continue to your Clip Art. |
||
|
|||
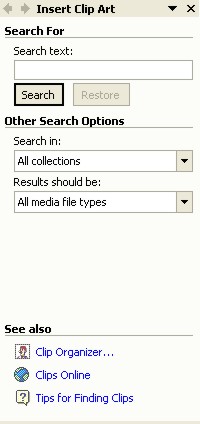
| 4. | The "Insert Clip Art" task pane is opened on the right-hand side of your document. | ||
|
|||
| From this task pane you can type in a criteria, i.e. a name of the picture that you are looking for and click the Search button. | |||
|
|||
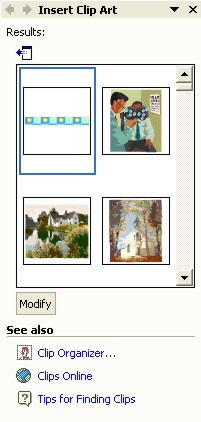
| 5. | A list of previewed images is shown in the Insert Clip Art task pane. | ||
|
|||
| Scroll through the images and find the one you want. | |||
|
|||
| 6. | Once you have the picture you want, click once on the clip art
image to insert it at the position of the cursor, or
click-and-drag it to a position on your document. You can click the Close button at the top-right corner of the Insert Clip Art task pane to close the task pane to the right of the window. |
||
|
|
Click on the new Microsoft Word ClipArt object once.
You'll see a new toolbar appears on your screen. Picture toolbar No toolbar? Click View ►Toolbars ►Picture. |
 |
Q: How do I
move the Picture toolbar out of the way? Place your mouse pointer over the word "Picture" on the title bar of the toolbar. Click-and-drag the toolbar to anywhere you want. P.S - You may need some practice in position the toolbar! |
Microsoft Word XP
Q & A
Antonyms
AutoCorrect
AutoShapes & Text Boxes
Bookmarks
Borders
Bullets
Change Case
ClipArt
Columns
Convert PDF to Word
Convert Word to HTML
Convert Word to PDF
Customize Menus
Customize Shortcut keys
Customize Toolbars
Delete a File
Delete Text
Download Borders
Download Fonts
Drop Cap
Envelopes
Find & Replace
Fonts
Footers
Format Painter
Headers
Highlight Text
Indent
Labels
Line Spacing
Macros
Mail Merge
Margins
Move or Copy
Numbering
Open a File
Outline Numbering
Page Numbers
Page Orientation
Page/Section Break
Password
PDF to Word Converter
Print Preview
Rename a File
Save a File
Screen Layout
Selecting Text
Special Characters
Spelling & Grammar
Styles
Symbols
Synonyms
Tables
Tabs
Text Wrap
Thesaurus
Undo
Word Counter
Word to HTML Converter
Word to PDF Converter
WordArt
Zoom


