Microsoft Word Help
|
|
|
|
|
|
|
|
|
|
|
|
|
|
Microsoft Word Help
Additional Resources
Microsoft Word Help - AutoShapes |
 |
|
|
What's on this page... Drawing Lines and Shapes Working with Text Boxes Locking Objects In Place Handling Objects That Overlap |
Drawing Lines And Shapes
The Drawing toolbar offers many opportunities for decorating documents and Web pages with lines, lines with arrows on the end, shapes such as ovals and rectangles, and what Word calls AutoShapes stars, banners, and various other shapes.Another way Microsoft Word help with drawing different shapes.
 |
Microsoft Word help with drawing these various shapes.
To draw lines and various shapes, follow these steps:
| 1. | Display the
Drawing toolbar. To do so, click the Drawing button on the Standard toolbar, or right-click a toolbar and choose Drawing from the shortcut menu. |
|
|
|
| The Drawing toolbar is displayed at the bottom of the screen, above the status bar. | |
| 2. |
Click the
appropriate button on the Drawing toolbar (from AutoShapes, line,
arrow, rectangle, ellipse or text box). The mouse pointer changes to a cross hair. Click-and-drag the pointer across the screen to draw the line or shape. |
Microsoft Word help you with ease in drawing different lines and shapes.
Here are the specifics of drawing lines and shapes:
| ► |
DRAWING LINES Click the Line button and drag the pointer across the screen to draw the line. |
| ► |
DRAWING
ARROWS ON LINES Start by clicking the Line or Arrow button and draw a line. To choose an arrow style of your own, select the line by clicking it, click the Arrow Style button, and choose a style from the pop-up menu. Choose More Arrows from the pop-up menu to go to the Format AutoShape dialog box and select different arrows or different-size arrows for either side of the line. |
| ► |
DRAWING
RECTANGLES AND OVALS Click the Rectangle or Oval button and drag the pointer across the screen to draw the rectangle or oval. Hold down the SHIFT key as you drag to draw a square or circle. |
| ► |
DRAWING
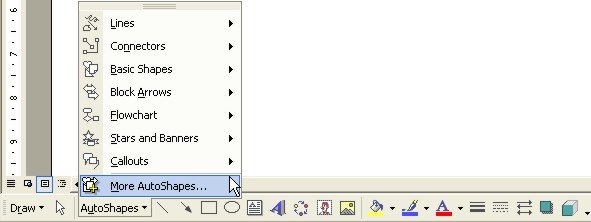
AN AUTOSHAPE Click the AutoShapes button, move the pointer over a submenu, and click a shape. Then drag the cursor across the screen to draw it. A yellow diamond appears beside some AutoShapes so that you can adjust their appearance. Drag the yellow diamond to make the AutoShape look just right. The AutoShapes submenus offer many different shapes. |
| ► |
PUTTING
SHADOWS AND THREE-DIMENSIONAL EFFECTS ON SHAPES Click a shape, click the Shadow or 3-D button, and choose shadow style or 3-D effect from the pop-up menu. Choose No Shadow or No 3-D to remove shadows and third dimensions. |
| See also... Working with Text Boxes |
| Locking Objects | Handle Objects that Overlap |
| Back to Top |
| Return to Microsoft Word XP from Microsoft Word Help - AutoShapes |
Microsoft Word XP
Q & A
Antonyms
AutoCorrect
AutoShapes & Text Boxes
Bookmarks
Borders
Bullets
Change Case
ClipArt
Columns
Convert PDF to Word
Convert Word to HTML
Convert Word to PDF
Customize Menus
Customize Shortcut keys
Customize Toolbars
Delete a File
Delete Text
Download Borders
Download Fonts
Drop Cap
Envelopes
Find & Replace
Fonts
Footers
Format Painter
Headers
Highlight Text
Indent
Labels
Line Spacing
Macros
Mail Merge
Margins
Move or Copy
Numbering
Open a File
Outline Numbering
Page Numbers
Page Orientation
Page/Section Break
Password
PDF to Word Converter
Print Preview
Rename a File
Save a File
Screen Layout
Selecting Text
Special Characters
Spelling & Grammar
Styles
Symbols
Synonyms
Tables
Tabs
Text Wrap
Thesaurus
Undo
Word Counter
Word to HTML Converter
Word to PDF Converter
WordArt
Zoom