Microsoft Word Help
|
|
|
|
|
|
|
|
|
|
|
|
|
|
Microsoft Word Help
Additional Resources
Microsoft Word Help
Microsoft Word Help
Microsoft Word Help - Columns
|
 |
|
|
What's on this page... Inserting Columns using the Columns Button Inserting Columns using the Columns Dialog Box Remove Columns |
Inserting Columns Using The Columns Dialog Box
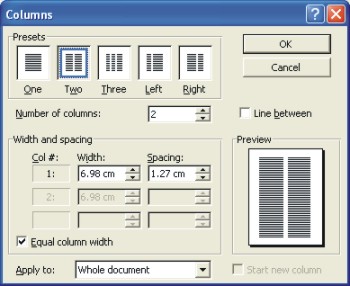
The Columns dialog box gives you much better control over your columns. You can choose to apply it to certain areas, or even adjust them to specific widths.To use the Columns dialog box, follow these steps:
| 1. | Select the text to be put into columns, or put the cursor in the section to be put into columns, or place the cursor at a position in the document where columns are to start appearing. |
| 2. | Choose Format ► Columns from the menu bar. |
 |
|
| 3. | Select from the different options from the Columns dialog box, as listed below, as you do, Microsoft Word help by showing your choices in the Preview box in the lower-right corner: |
| ►
PRESETS Click a box to choose a preset number of columns. Notice that, in some of the boxes, the columns aren't of equal width. Choose One if you want to remove columns from a document. |
|
| ►
NUMBER OF COLUMNS If you want more than three columns, enter a number here. |
|
| ►
LINE BETWEEN Click this box to put vertical lines between columns. Keep your eye on the Preview box, as you choose this. |
|
| ►
COL # If your document has more than three columns, a scroll bar appears to the left of the Col # boxes. Scroll to the column you want to work with. |
|
| ►
WIDTH If you click the Equal Column Width box to remove the check mark, you can make columns of unequal width. Change the width of each column by using the width boxes. |
|
| ►
SPACING Determines how much blank spaces appear to the right of the column. |
|
| ►
EQUAL COLUMN WIDTH Click this box to remove the check mark if you want columns of various widths. |
|
| ►
APPLY TO Choose which part of the document you want to columnize selected text, the section the cursor is in, this point forward in your document, or the whole document. |
|
| ►
START NEW COLUMN This box is for putting empty space in a column, perhaps to insert a text box or picture. Place the cursor where you want the empty space to begin, open the Columns dialog box, click this check box, and choose "This Point Forward" from the "Apply To" drop-down list. Text below the cursor moves to the next column. |
|
| 4. | Click OK. |
|
|
To move from the middle of one column over to the next column press CTRL + SHIFT + ENTER OR Choose Insert ► Break from the main menu, and choose the Column Break option. |
| See also... Insert Columns with Columns Button | Remove Columns |
| Back to Top |
| Return to Microsoft Word XP from Microsoft Word Help - Columns |
Microsoft Word Help
Q & A
Antonyms
AutoCorrect
AutoShapes & Text Boxes
Bookmarks
Borders
Bullets
Change Case
ClipArt
Columns
Convert PDF to Word
Convert Word to HTML
Convert Word to PDF
Customize Menus
Customize Shortcut keys
Customize Toolbars
Delete a File
Delete Text
Download Borders
Download Fonts
Drop Cap
Envelopes
Find & Replace
Fonts
Footers
Format Painter
Headers
Highlight Text
Indent
Labels
Line Spacing
Macros
Mail Merge
Margins
Move or Copy
Numbering
Open a File
Outline Numbering
Page Numbers
Page Orientation
Page/Section Break
Password
PDF to Word Converter
Print Preview
Rename a File
Save a File
Screen Layout
Selecting Text
Special Characters
Spelling & Grammar
Styles
Symbols
Synonyms
Tables
Tabs
Text Wrap
Thesaurus
Undo
Word Counter
Word to HTML Converter
Word to PDF Converter
WordArt
Zoom