Microsoft Word Help
|
|
|
|
|
|
|
|
|
|
|
|
|
|
Microsoft Word Help
Additional Resources
Microsoft Word Help
Microsoft Word Help - Customize Word |
 |
You can make Word work your way by putting the menu commands in different places, inventing your own keyboard shortcuts for executing commands, and even creating your own toolbars.
|
|
What's on this page... Changing the Menu Commands Changing the Keyboard Shortcuts |
Changing The Menu Commands
You can decide for yourself which menu commands appear on which menus.You can also add macros, fonts, AutoText entries, and styles to menus.
Microsoft Word help you in doing so is easy, and if you make a mistake, going back to the original menus is easy, too.
To remove, add or change position of the menu commands, follow these steps:
| 1. | Choose Tools from the menu bar, and select Customize. |
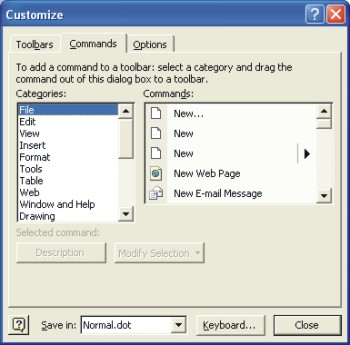
| 2. | Click the Commands tab. |
 |
|
| 3. | In
the Categories list, select the menu you want to
change. If you're adding a macro, font, AutoText entry, or style to a menu, scroll to the bottom of the Categories list and select it. The commands that are on the menu you chose appear in the Commands list on the right. |
| 4. | Choose the command the you want to change from the
Commands list. You can click the Description button to read a description of the command if you aren't quite sure what it does. |
| 5. | What
you do next depends on whether you want to remove a
command from a menu, add a command to a menu, or change
its position on a menu. With Microsoft Word help, changing menu commands requires moving the mouse-pointer out of the Customize dialog box and clicking the menu bar. |
| ►
REMOVING To remove a menu command, move the mouse-pointer over the menu that holds the command you want to remove and click gently. That's right-click the name, as you normally would if you were pulling it down to choose one of its commands. When the menu appears, click the menu command you want to remove, and drag it off the menu. You see a gray rectangle above the pointer and an X below it. Release the mouse button after you have dragged the menu command away from the menu. |
|
| ►
ADDING To add a menu command to a menu, drag it from the Commands list in the Customize dialog box to the menu itself. As you do this, you see a gray rectangle above the pointer and a + below it. Move the pointer over the menu to which you want to add the command. The menu appears. Gently drag the mouse-pointer down the menu to the spot where you want the command to be listed. A black line appears on the menu to show where your command will go. When the command is in the right spot, release the mouse button. Microsoft Word help by placing this automatically where you position the mouse. |
|
| ►
CHANGING POSITION To change the position of a command on a menu, move the mouse-pointer out of the Customize dialog box and gently click on the menu whose command you want to move. Then drag the mouse-pointer up or down the list of commands. A black line shows where the command will move when you release the mouse button. When the black line is in the right spot, let go of the mouse button. |
|
| 6. | If you want the menu changes you make to be made to a template other then Normal.dot or the template you are working in, choose the template in the Save In drop-down list. |
| 7. | Click Close. |
|
|
If you wish that you hadn't messed with the menus, Microsoft Word help you to set them back as they were, choose TOOLS ► CUSTOMIZE, click the COMMANDS tab, move the mouse-pointer out of the dialog box and RIGHT-CLICK on the name of the menu whose commands you fooled with, and choose RESET from the shortcut menu. |
| Back to Top |
| See also... Changing the Keyboard Shortcuts |
| Return to Microsoft Word XP from Microsoft Word Help - Customize Word |
Microsoft Word XP
Q & A
Antonyms
AutoCorrect
AutoShapes & Text Boxes
Bookmarks
Borders
Bullets
Change Case
ClipArt
Columns
Convert PDF to Word
Convert Word to HTML
Convert Word to PDF
Customize Menus
Customize Shortcut keys
Customize Toolbars
Delete a File
Delete Text
Download Borders
Download Fonts
Drop Cap
Envelopes
Find & Replace
Fonts
Footers
Format Painter
Headers
Highlight Text
Indent
Labels
Line Spacing
Macros
Mail Merge
Margins
Move or Copy
Numbering
Open a File
Outline Numbering
Page Numbers
Page Orientation
Page/Section Break
Password
PDF to Word Converter
Print Preview
Rename a File
Save a File
Screen Layout
Selecting Text
Special Characters
Spelling & Grammar
Styles
Symbols
Synonyms
Tables
Tabs
Text Wrap
Thesaurus
Undo
Word Counter
Word to HTML Converter
Word to PDF Converter
WordArt
Zoom