Microsoft Word Help
|
|
|
|
|
|
|
|
|
|
|
|
|
|
Microsoft Word Help
Additional Resources
Microsoft Word Help
Microsoft Word Help - Styles
|
 |
|
|
What's on this page... Apply a Style Creating a New Style with the Style Menu Creating a New Style with the New Style Dialog Box Modify a Style Delete a Style |
If you want to do any serious work whatsoever in Word, you need to know about styles.
A style is a collection of formats that have been bundled under one name. Instead of visiting many different dialog boxes to reformat a paragraph, you can choose a style from the Style menu and the paragraph is reformatted instantaneously.
The beauty of a style is that if you modify a style, Microsoft Word help by instantly modifies all paragraphs in your document that were assigned the given style.
What's more, many Microsoft Word help features rely on styles.
For example, before you can see the Document Map, organize a document with an outline, or generate a table of contents, you must have assigned heading styles to headings in your document.
Turning a Word document into a Web page is easy if you thoughtfully assigned styles to the different parts of the document.
By using styles, you make sure that the different parts of a document are consistent with one another and that your document has a professional look.
Creating A New Style with the Style Menu
Microsoft Word help you to create new styles and add them to the Style menu in two ways:with the Format ► Styles and Formatting command or directly in the Style button.
First, the style button method, which you can use to create paragraph styles.
To create a new style using the Style button, follow these steps:
| 1. | Click
a paragraph whose formatting you would like to turn into a
style and apply to other paragraphs in your document. Remember, a heading is also a paragraph as far as Word is concerned, so if you're creating a style for a heading, click the heading. |
||
| 2. | Click inside the Style drop-down list from the Formatting toolbar, and type a name for the style. Choose a meaningful name that you will remember. | ||
|
|||
| 3. | Press the Enter key. | ||
| You'll notice that the new style is available for using via the Styles drop-down list. | |||
Creating A New Style with the New Style Dialog Box
When you create a new style from scratch with the Format ► Styles and Formatting command, it takes a bit longer, but you can be very precise about the style and its formatting.Microsoft Word help you in creating a new style easily with the New Style dialog box.
To create a new style using the New Style dialog box, follow these steps:
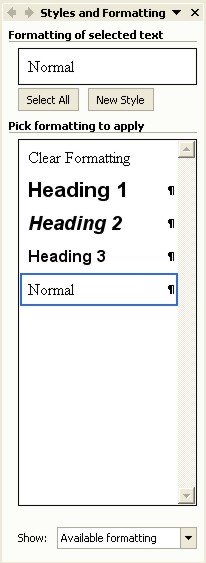
| 1. | Choose Format ► Styles and Formatting from the menu bar to open the Styles and Formatting task pane to the right of the document window. |
 |
|
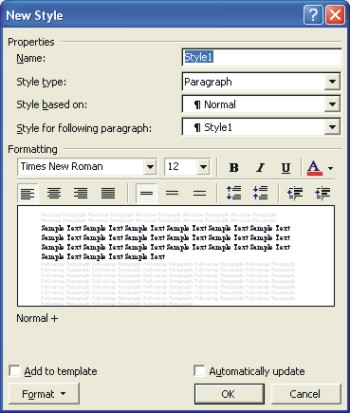
| 2. | Click the New Style button, to open the New Style dialog box. |
 |
|
| 3. | Fill in the New Style dialog box. |
| As you do so, keep your eyes on the Preview box, Microsoft Word help you with the preview to see what your new style will look like: | |
| ►
NAME Enter a name for the style. The name you enter will appear on the Style menu. |
|
| ►
STYLE TYPE Click the down arrow and choose Character if you're creating a style for characters rather than paragraphs. |
|
| ►
STYLE BASED ON If your new style is similar to one that is already on the menu, click here and choose the style to get a head start on creating the new one. Be warned, however, that if you or someone else changes the Base On style, your new style will inherit those changes and be altered as well. |
|
| ►
STYLE FOR FOLLOWING PARAGRAPH Choose a style from the drop-down list if the style you're creating is always followed by an existing style. For example, a new style called Chapter Title might always be followed by a style called Chapter Intro Paragraph. |
|
| ►
ADD TO TEMPLATE Adds the style to the documents template so that other documents based on the template you are using can also make use of the new style. |
|
| ►
AUTOMATICALLY UPDATE With this box checked, all paragraphs in the document that were assigned the style are altered each time you change a single paragraph that was assigned the style. |
|
| ►
FORMAT This is the important one. Click the button and make a formatting choice. Word takes you to dialog boxes so that you can create the style. |
|
| 4. | Click OK to close the New Style dialog box. |
| Your new style is now listed in the Styles and Formatting task pane, ready for you to use. |
|
|
Remember that a style you create are only available in the document you've created it in. Styles aren't copied to new documents. You'll notice that when you start a New Document, that the Styles list is back to default. However !! In the New Style dialog box, check mark "Add to Template" to make it available to other New Documents. |
| Back to Top |
| see also... Apply a Style | Modify a Style | Delete a Style |
| Return to Microsoft Word XP from Microsoft Word Help - Styles |
Microsoft Word XP
Q & A
Antonyms
AutoCorrect
AutoShapes & Text Boxes
Bookmarks
Borders
Bullets
Change Case
ClipArt
Columns
Convert PDF to Word
Convert Word to HTML
Convert Word to PDF
Customize Menus
Customize Shortcut keys
Customize Toolbars
Delete a File
Delete Text
Download Borders
Download Fonts
Drop Cap
Envelopes
Find & Replace
Fonts
Footers
Format Painter
Headers
Highlight Text
Indent
Labels
Line Spacing
Macros
Mail Merge
Margins
Move or Copy
Numbering
Open a File
Outline Numbering
Page Numbers
Page Orientation
Page/Section Break
Password
PDF to Word Converter
Print Preview
Rename a File
Save a File
Screen Layout
Selecting Text
Special Characters
Spelling & Grammar
Styles
Symbols
Synonyms
Tables
Tabs
Text Wrap
Thesaurus
Undo
Word Counter
Word to HTML Converter
Word to PDF Converter
WordArt
Zoom