Microsoft Word XP
|
|
|
|
|
|
|
|
|
|
|
|
|
|
Additional Resources
Microsoft Word XP - FAQ | Page 2
|
 |
Q: How do you get Hidden text "unhidden"? |
|
| Click on the "Show/Hide" button. This will let the hidden text magically appear, allowing you to select it and return to the Font dialog box, and uncheck the "Hidden" option. | |
Q: Why is my Bold / Italic / Underline not showing? |
|
| Remember to select your text first, then apply Bold, Italic or Underline! | |
Q: How do I remove the highlight from text? |
|
| Click the drop-down arrow next to the Highlight button. Choose None and drag over the highlighted text. |
|
Q: Why is Word changing certain words that I type, automatically? |
|
| Word has a special function called AutoCorrect. You can change the settings of AutoCorrect, by choosing Tools ► AutoCorrect Options and making your changes from there. |
|
Q: How do I get my original menus back to normal? |
|
| If you wish that you hadn't messed with the menus and want to set them back as they were, choose TOOLS ► CUSTOMIZE, click the COMMANDS tab, move the mouse-pointer out of the dialog box and RIGHT-CLICK on the name of the menu whose commands you fooled with, and choose RESET from the shortcut menu. | |
Q: How do I get my original keyboard shortcuts back to normal? |
|
| You can always get the old keyboard shortcuts back by choosing the
RESET ALL button in the
CUSTOMIZE
KEYBOARD dialog box. Click YES when Word asks whether you really want the old keyboard shortcuts back. |
|
Q: Why is my Header and Footer grey? |
|
| This
is Word's way of showing you that this is the header and this is
the footer. You can double-click in the grey header or footer (in Print Layout View) to go back into Header & Footer mode. To see how the finished header and footer fits with the rest of your document, click the Print Preview button to get a good overview! |
|
Q: Why is the Page Number grey? |
|
| This is Word's way of showing you that you've used the Page Numbers command and not just typed it in as normal. | |
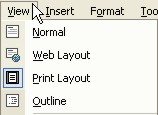
Q: How do I know in which view my document currently is? |
|
Click View
on the menu bar.  The view that is selected is the one with the blue square around its icon. As the example above shows, the view is currently on Print Layout. |
|
Q: How do I know a section break has been inserted? |
|
| Click the Show/Hide button
on the Standard toolbar to see where the section break has been
inserted into your document. |
|
Q: What's the difference between the DELETE and BACKSPACE keys? |
|
| When you press the DELETE key, you erase text to the
RIGHT of the cursor. When you press the BACKSPACE key, you erase text to the LEFT of the cursor. |
|
Q: Why did my text jump around when I move the tab marker? |
|
| You MUST select all the text using a specific tab stop that you want to change. | |
Q: How do I get my toolbars back? |
|
| To get the officially certified Microsoft toolbar that came with the program, click the toolbar arrow, choose Add or Remove buttons, and choose Reset Toolbar at the bottom of the buttons list. | |
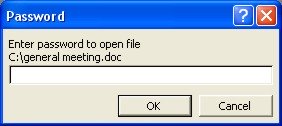
Q: How do I open a password protected document? |
|
Open the document as usual. The
Password dialog box is
displayed. Type in the password
and click OK! |
|
Q: I'm not getting there! |
|
| If pressing CTRL + Home doesn’t get you to the
top or bottom (CTRL + End) of a page, it’s because you click the
Select Browse Object button at the bottom of the
vertical scroll bar, so Word goes to the next
bookmark, comment, heading, or whatever. Click the Select Browse Object button and choose Browse by Page to make these key combinations work again.  Select
Browse Object button
 |
|
Q: How do I Drop Cap an entire word? |
|
| Just select the entire word to drop cap and then use the drop cap command. | |
Q: How do I remove the drop cap? |
|
| Place the cursor inside the dropped cap, return to Format Drop Cap and choose the Position of None! | |
| Back« 1 | 2 |
| Back to Top |
| Return to Microsoft Word XP from Microsoft Word XP - Q & A |
Additional Resources
Q & A
Antonyms
AutoCorrect
AutoShapes & Text Boxes
Bookmarks
Borders
Bullets
Change Case
ClipArt
Columns
Convert PDF to Word
Convert Word to HTML
Convert Word to PDF
Customize Menus
Customize Shortcut keys
Customize Toolbars
Delete a File
Delete Text
Download Borders
Download Fonts
Drop Cap
Envelopes
Find & Replace
Fonts
Footers
Format Painter
Headers
Highlight Text
Indent
Labels
Line Spacing
Macros
Mail Merge
Margins
Move or Copy
Numbering
Open a File
Outline Numbering
Page Numbers
Page Orientation
Page/Section Break
Password
PDF to Word Converter
Print Preview
Rename a File
Save a File
Screen Layout
Selecting Text
Special Characters
Spelling & Grammar
Styles
Symbols
Synonyms
Tables
Tabs
Text Wrap
Thesaurus
Undo
Word Counter
Word to HTML Converter
Word to PDF Converter
WordArt
Zoom