Excel Worksheets
|
|
|
|
|
|
|
|
|
|
|
|
|
|
Excel Worksheets
Additional Resources
View Excel Worksheets | Microsoft Excel XP | Page 2 |
 |
 |
What's on this page... Using Full Screen View Zoom Excel Worksheets Freeze Row or Column Titles Split a Worksheet |
Freeze Row Or Column Titles
Another way to view your Excel worksheets is to freeze the row or column titles.Many Excel worksheets (such as budgets) are set up with row and column headings. When you scroll through such a worksheet, it's very easy to get lost when the row and column headings scroll out of view. Excel provides a handy solution - freezing rows and/or columns.
To freeze rows or columns, follow these steps:
| 1. | Move the cell pointer to the cell below the row that you
want to freeze and to the right of the column that you want to freeze. |
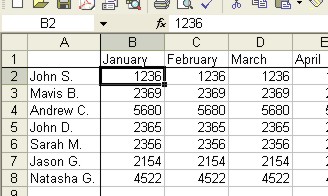
| For example, to freeze row 1 and column A, move the cell pointer to cell B2. | |
| 2. | Choose Window ► Freeze Panes from the menu bar. |
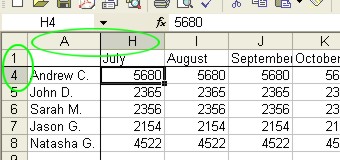
Excel inserts dark lines to indicate the frozen rows and columns.
 |
Notice that as you scroll throughout the worksheet, that the frozen rows and columns remains visible. Notice, in the example below, how the column headings and row headings indicate the static ability of the frozen rows and columns.
 |
To unfreeze rows or columns, follow these steps:
| 1. | Any cell can be selected in the worksheet area. |
| 2. | Choose Window ► Unfreeze Panes from the menu bar. |
Split a Worksheet
Another way to view more rows and columns together, is to split the worksheet area into different panes. This view may seem a bit unnatural at first, but if you grasp the concept, it will seem much easier.Splitting a window into two or four panes let's you view multiple parts of the same worksheet as long as you think your mind can handle it.
To add a split to the worksheet area, use any one of the following steps:
| ► | Choose Window ► Split from the menu bar. This command splits the active worksheet into four separate panes. |
 |
|
| OR | |
| ► |
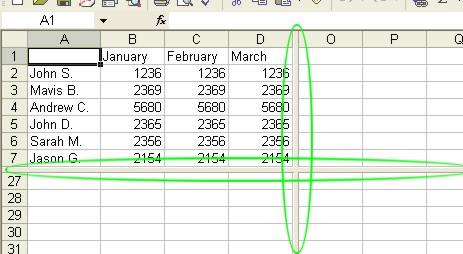
Drag the split bar to where you want the split to appear. There are 2 split bars: Horizontal split bar located at the top of the horizontal scroll bar, and Vertical split bar located to the right of the vertical scroll bar. |
 Horizontal Split Bar
 |
|
 Vertical Split Bar
 |
You can use the mouse to drag any one of the panes and resize it.
To remove a split from the worksheet area, use any one of the following steps:
| ► | Choose Window ► Remove Split from the menu bar. |
| OR | |
| ► | Double-click any one of the splits, to remove them one-at-a-time. |
| Back to Top |
| See also... Use Full Screen View | Zoom a Worksheet |
| Return to Excel XP from View Excel Worksheets |
Excel XP Topics
- Tips- Excel Screen Layout
- Navigational Techniques
- Working with Workbooks
- Templates
- Working with Worksheets
- Moving Around
- Move Worksheets
- Copy Worksheets
- Insert & Delete Cells
- Insert & Delete Rows
- Insert & Delete Columns
- Resize Row
- Resize Column
- Editing Data
- Content Color
- Cell Color
- Number Formats
- Fonts
- Alignment
- Text Direction
- Indent Contents
- Merge Cells
- Copy
- Move
- Undo & Redo
- Using Zoom
- Freeze & Unfreeze Titles
- Split Worksheet
- Spreadsheet Data
- AutoFill
- AutoComplete
- Comment
- Find
- Replace
- Spellcheck
- Formulas
- Functions
- Password
- Sorting
- AutoFilter
- Advanced Filter
- Macros
- Charts
- Charting
- Charting Elements
- Gantt Chart
- PivotTable
- PivotTable Calculations
- PivotTable Layout
- PivotTable Format
- PDF to Excel
- PDF-to-Excel Converter
- Excel to PDF Converter