Word 2007 Tutorial
|
|
|
|
|
|
|
|
|
|
|
|
|
|
Additional Resources
Word 2007 Tutorial | Fonts & Attributes |
|
This Word 2007 tutorial will teach you step-by-step how to change fonts and add some cool and interesting effects to your text.
Changing fonts can be lots of fun, lets add something special to your document text. You'll see that doing these changes (and undoing them) are made easy. Also learn how to change the character's position and spacing to make your text look just right.
Align your text the correct way with no hassle. And, just for fun, highlight your text for some different effect different.
|
|
What's on this page... Changing Fonts, Size & Color Using the Font dialog box Changing Character Position & Spacing Aligning Text Highlight Text |
Word 2007 Tutorial: Changing Fonts, Size & Color
Font is the catch-all name for type style and type size. This Word 2007 tutorial will show you when you change fonts, you choose another style of type or change the size of letters. Word offers a whole bunch of different fonts. You can see their names by clicking the down-arrow next to the Font drop-down list and scrolling down the list.|
|
Fonts with TT beside their names are TrueType fonts. These fonts look the same on-screen as they do when printed on paper. You can also find free downloadable Microsoft Word Fonts to add to your font list. |
To change the font of text, follow these steps:
| 1. | Select the text or place the cursor where you want the font to change. |
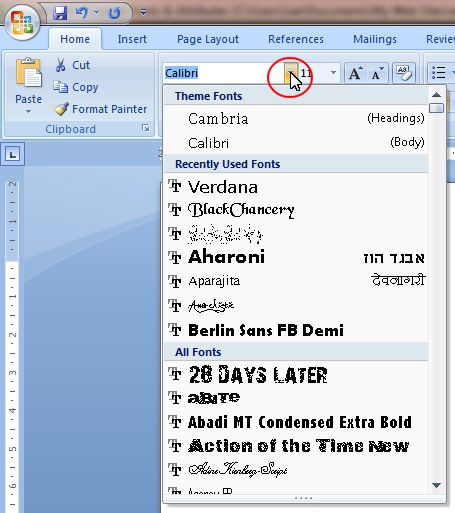
| 2. | Click the down arrow on the Font drop-down list from the Home tab. You'll see the names of fonts, each one dressed up and looking exactly like itself. Word puts all the Them Fonts first in the list, then it shows the fonts you've used so far in the document to make it easier for you to find the fonts you use most often. |
| 3. | Scroll down the list of fonts, if necessary. |
| 4. | Click the font name you want to use. |
This Word 2007 Tutorial will show you that it's easy to change the font with the Font drop-down list. |
 |
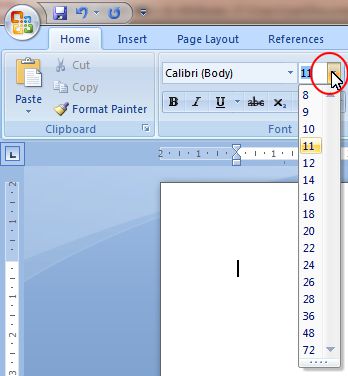
To change the size of fonts text, follow these steps:
| 1. | Select the text or place the cursor where you want the larger or smaller letters to start appearing. |
| 2. | Click the down arrow on the Font Size drop-down list, located on the Formatting Toolbar. |
| 3. | Scroll down the list if you want a large font. |
| 4. | Click a point size 8, 12, 36, 48, etc. |
This Word 2007 tutorial will show you how to use the Font Size button to change the size of text, or type in a new size of your choice. |
 |
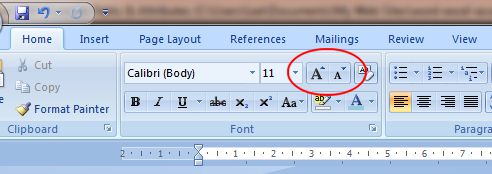
You can also change the font size of text by clicking the Grow Font or Shrink Font buttons on the Home tab.
 |
|
|
Using the Font
Dialog box To change fonts and font sizes at the same time, click the Font dialog box expand button and make your choices in the Font dialog box. 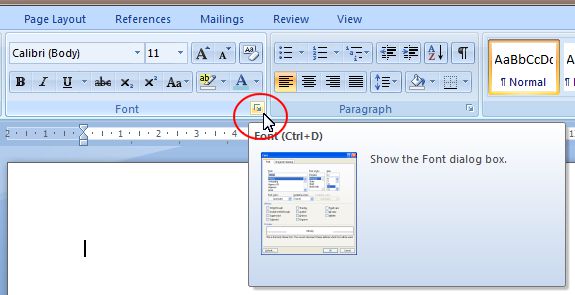 |
Type (Font size) is measured in points. A point is 1/72 of an inch. The larger the point size, the larger the letters. Business and love letters usually use 10- or 12-point type.
For headings, choose a larger point size.
To change the Color of fonts text, follow these steps:
If you're lucky enough to own or have access to a color printer, you can print text in different colors. And even if you don't own a color printer, you can change the color of text on-screen. You may do that to call attention to parts of a document or Web page. For example, Word offers 35 colors, plus white, black, and four gray shades, as a standard list to choose from. You can also click More Colors to have a wider choice of colors to choose from.
| 1. | Select the text. |
| 2. | Click the down arrow beside the Font Color button (located at the end of the Formatting Toolbar) and click a color, black, white, or one of the four gray shades. |
To change the color of the Font is as easy as clicking a button. |
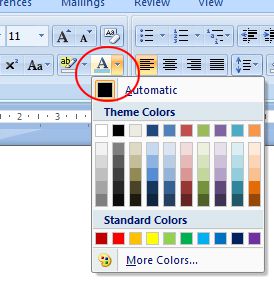 |
After you choose a color, the Font Color button changes color and becomes the color you chose. To apply the same color again, click the Font Color button without having to open the drop-down list.
|
|
Using the Font
dialog box: You can also apply colors by using the Font dialog box. To get there, click the Font dialog box expand button from the Home tab. |
To change the color of fonts text back to normal, select it, click the Font Color drop-down list, and choose Automatic.
Word 2007 Tutorial: Using the Font Dialog box
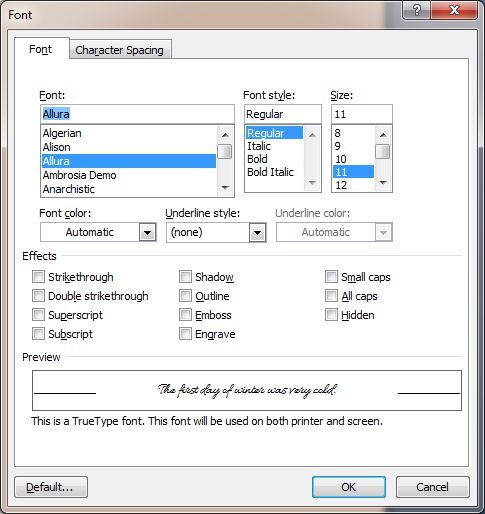
The Font Dialog box has a lot more options to choose from. You can add more effects to your text, your boss might even think you didn't use fonts!The fonts dialog box allows you to add a different kind of underline, e.g. a double underline. You can change your characters to superscript or subscript, you can even change your text to all caps, add a shadow, emboss or engrave your text. The option for using double strikethrough is also available.
 |
Q: What is Superscript and Subscript? Superscript makes characters smaller (than usual) and places the character above the baseline, e.g. 1st, 2nd, etc. Subscript makes the characters smaller (than usual) and places the character below the baseline, e.g. EGPlastic copyright etc. |
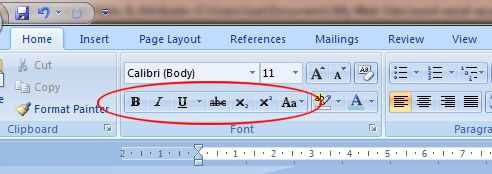
To add effects to text using the buttons, follow these steps:
| 1. | Select the text you want to add an effect to. |
| 2. | Click one of the effect buttons on the Home tab from the Font group. |
 |
|
| You'll notice that the effect added to your text will keep the selected button impressed. To remove this effect, just click on the button again. |
To use the fonts dialog box, follow these steps:
| 1. | Select the text of which you want to change the font. | ||
| 2. | Click the Font dialog box expand button from the
Home tab. |
||
 |
|||
| The Font dialog box opens. You'll see there are two tabs to choose from at the top of the window, for the moment, leave it at Font. | |||
|
|||
| 3. | Now, you can select the Font, Style, Size and Font Color that
you want. You can also select a different Underline style from the Underline Style drop-down list. |
||
| 4. | From the Effects option group, make your choices as wanted. You'll see as you checkmark an effect, the preview is updated. You can check and uncheck any combination of the choices, unless you are choosing the opposite of one another. For example, Strikethrough / Double strikethrough, Superscript / Subscript, Emboss / Engrave, Small caps / All caps. Play around with the choices and you'll see what each option does. |
||
|
|||
| 5. | Once you're done with your choices, click OK, for the changes to take effect on your text. | ||
| Anytime that you want to remove some effects, select the text, go back to the Font dialog box and remove the checkmarks of those you don't want. | |||
Word 2007 Tutorial: Changing Character Spacing and Position
You can play around with your text a lot. You can change the spaces between the characters of a word. You can also change the position of the baseline of your text or of certain characters. The options are endless with fonts!|
|
To change character spacing or position, follow these steps:
| 1. | Select the text of which you want to change character spacing or position. | ||
| 2. | Click the Font dialog box expand button from the
Home tab. |
||
 |
|||
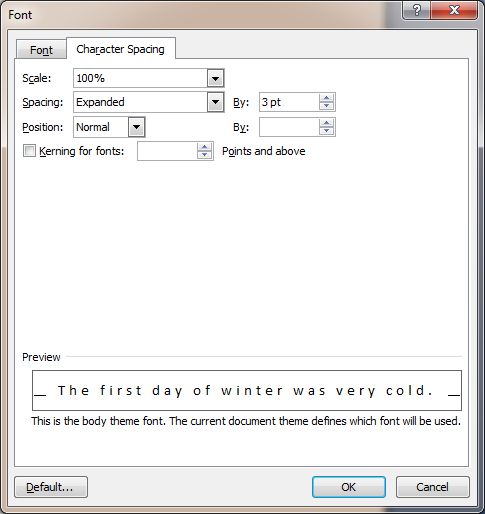
| The Font dialog box opens. Click on the Character Spacing tab. | |||
|
|||
| 3. | Select a percentage from the Scale drop-down
list box. This will increase or decrease the scale of your text on
the page. From the Spacing drop-down list box, select Expanded or Condensed and choose a point size by which you want to expand or condense your text. From the Position drop-down list box, select Raised or Lowered and choose a point size by which you want to raise or lower your text. You can use any of the three options in combination with each other. |
||
| 4. | Once you've made your choices, click OK, for the changes to take effect on your text. | ||
| Anytime that you want to remove some effects, select the text, go back to the Font dialog box and select 100% or Normal of those that you want back to normal. | |||
Word 2007 Tutorial: Aligning Text
Some text are just better aligned on the right side of a page, e.g. an address. Or aligned in the center of the page, e.g. a heading. Sometimes, paragraphs (as in columns) are aligned on both sides, this makes the columns look neater.Aligning text is as easy as pie! Use the following table to select different alignment for text.
All you have to do to align text in a new way is select the text and either click an Alignment button from the Home tab or press a keyboard shortcut as shown in the table below.
| Button Name | Keyboard Shortcut | What it does... |
|
Align Text Left |
CTRL + L | Lines up text along the left margin or left side of columns or cells. |
|
Center |
CTRL + E | Centers text, leaving space on both sides. |
|
Align Text Right |
CTRL + R | Lines up text along the right margin or right side of columns or cells. |
|
Justify |
CTRL + J | Lines up text on both the left and right margins or sides of columns or cells. |
Word 2007 Tutorial: Highlight Text
Highlighting your fonts text, gives your content a bit more emphasis where you choose to have it.|
|
To highlight text, follow these steps:
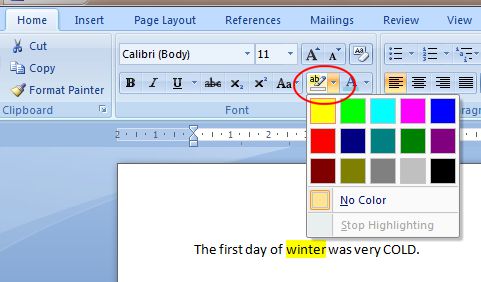
| 1. | After you've typed your text, click the drop-down arrow next to the Text Highlight Color button. |
 |
|
| 2. | Click on the color that you want to highlight with. Your mouse-pointer changes and gets a little highlighter icon next to it. |
|
|
|
| 3. | Click-and-drag with your mouse pointer over the text that you want to highlight. |
| 4. |
Click on the Highlight button again to return
your mouse pointer to normal. Or, select Stop Highlighting from the drop-down list. |
|
|
Q: How do I remove the highlight from text? Click the drop-down arrow next to the Highlight button. Choose No Color and drag over the highlighted text. |
| Back to Top |
| Return to Microsoft Word 2007 from Word 2007 Tutorial: Fonts & Attributes |
Microsoft Word 2007
TOPICS
- On-screen elements
- Save a file
- Open a file
- Rename a file
- Delete a file
- Select
- Undo/Redo
- Deleting
- Copy
- Move
- Format Painter
- Font Attributes
- Font Dialog Box
- Alignment
- Highlight text
- Character Spacing
- Indent
- Line Spacing
- Change Case
- Symbols
- Borders & Shading
- Download Borders
- Page Break
- Section Break
- Header
- Footer
- Page Number
- Margins
- Landscape/Portrait
- Vertical Alignment
- Paper Size
- Print
- Print Preview
- Thesaurus
- Spelling & Grammar
- AutoCorrect
