Word 2007 Tutorial
|
|
|
|
|
|
|
|
|
|
|
|
|
|
Additional Resources
Word 2007 Tutorial | On-screen Elements |
|
|
|
What's on this page... What all the stuff on-screen is What is a document? Moving around in a document Understanding how paragraphs work Zipping around with the scroll bar Working in many documents at once Zooming In or Out Exiting Microsoft Office Word |
What all the stuff on-screen is
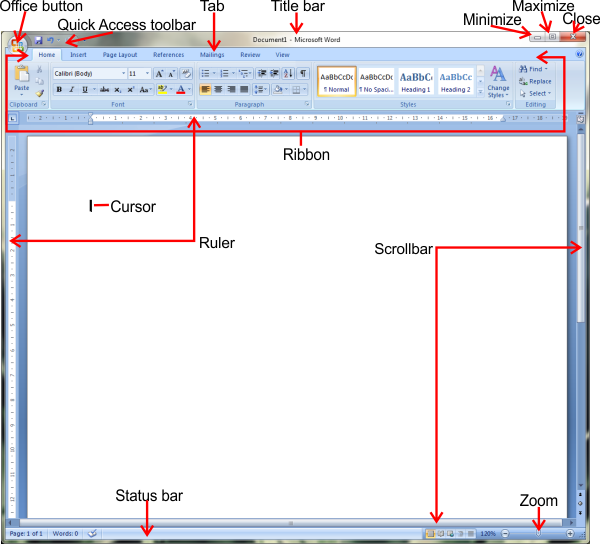
Seeing the Word 2007 screen for the first time is sort of like trying to find your way through Tokyo’s busy Ikebukuro subway station. Just check out the screen. It’s intimidating. But once you start using Word 2007, help will quickly follow and you'll find out what everything is. Word 2007 Tutorial: In the meantime, the following table and image gives you some short descriptions and guidance of how to go about using Word 2007.For new users this seems not too bad, but for the more experienced users of Word, this might seem like a totally different program that they are used to. Don't worry, either way you'll soon feel very comfortable using Word 2007, just use this Word 2007 tutorial.
 |
| Part of Screen | What It Is... |
| Title Bar | At the top of the screen, the title bar tells you the name of the document you’re working on. |
| Office button |
The Office button replaces the File menu from previous versions of
Word. When you click the Microsoft Office Button, you see the same basic commands available in earlier releases of Microsoft Office to open, save, and print your file. However, more commands are now available, such as Finish and Publish. |
| Quick Access toolbar | The Quick Access Toolbar is a customizable toolbar that contains a set of commands that are independent of the tab that is currently displayed. You can add buttons that represent commands to the Quick Access Toolbar, and you can move the Quick Access Toolbar from one of the two possible locations. |
| Ribbon |
When you first start some of the programs in 2007 Microsoft Office system, you
may be surprised by what you see. The menus and toolbars in some programs have
been replaced with the Ribbon. The Ribbon is designed to help you quickly find the commands that you need to complete a task. Commands are organized in logical groups, which are collected together under tabs. Each tab relates to a type of activity, such as writing or laying out a page. To reduce clutter, some tabs are shown only when needed. For example, the Picture Tools tab is shown only when a picture is selected. |
| Ruler | The ruler shows in which measurement of units the document is created, and also show any tabs that was used. |
| Scroll Bars | The scroll bars helps you get from place to place in a document. |
| Status Bar | The status bar gives you basic information about where you are and what you’re doing in a document. It tells you what page and what section you’re in, the total number of pages in the document, and where the cursor is on the page. |
What is a document?
Word 2007 Tutorial: A document is just a fancy word for a letter, report, announcement, or proclamation that you create with Word 2007.When you first start Microsoft Office Word, you’ll see a document with the generic name “Document1”.
But if you already have a document on-screen and you want to start a new one, click the Office button and choose New, click OK.
Word 2007 Tutorial: A brand-new document opens with the generic name “Document2” in the title bar. (The title bar is the bar across the top of the computer screen where Word identifies the document.) It’s called “Document2” because it’s the second one you’re working on. The document keeps that name, “Document2”, until you save it and give it a name of your choice.
Moving around in a document
Word 2007 Tutorial: Documents have a habit of getting longer and longer, and as they do that it takes more effort to move around in them. Microsoft Word help with this by making it easier to move around. Here are some keyboard shortcuts for moving the cursor around in documents.| Key to press | Where it takes you... |
| Page Up | The cursor moves Up the length of one screen. |
| Page Down | The cursor moves Down the length of one screen. |
| Home | The cursor moves to the beginning of a line. |
| End | The cursor moves to the end of a line. |
| Ctrl + Page Up | The cursor moves to the previous page in the document. |
| Ctrl + Page Down | The cursor moves to the next page in the document. |
| Ctrl + Home | The cursor moves to the beginning of the document. |
| Ctrl + End | The cursor moves to the end of the document. |
Understanding how paragraphs work
Word 2007 Tutorial: Back in English class, your teacher taught you that a paragraph is a part of a longer composition that presents one idea or, in the case of dialogue, represents the words of one speaker. Your teacher was right, too, but for Word Processing purposes, a paragraph is a lot less than that.In Word Processing, a paragraph is simply what you put on-screen before you press the Enter key. For instance, a heading is a paragraph. So is a graphic. If you press Enter on a blank line to go to the next line, the blank line is considered a paragraph.
If you type "Dear John" at the top of a letter and press Enter, “Dear John” is a paragraph.
It’s important to know this because paragraphs have a lot to do with formatting. If you use the Paragraph dialog box and monkey around with the paragraph formatting, all your changes affect everything in the paragraph that the cursor is in.
To make formatting changes to a whole paragraph, all you have to do is place the cursor anywhere inside the paragraph. You don’t have to select the paragraph. And if you want to make formatting changes to several paragraphs in a row, all you have to do is select those paragraphs first. (Click-and-drag your mouse over the text.)
Zipping around with the Scroll Bar
Word 2007 Tutorial: You can use the scroll bar to get around in documents. The scroll bar is the vertical bar along the right side of the screen that resembles an elevator shaft.Here's how to move around with the scroll bar:
| ♦ | To move through a document quickly, grab the elevator (called the scroll box) and drag it up or down. As you scroll, a box appears with the page number and the names of headings on the pages you scroll past (provided you assigned Word styles to those headings). |
| ♦ | To move line by line up or down, click the up or down arrow (scroll arrows) at the top or bottom of the scroll bar. |
| ♦ |
To move screen-by-screen, click anywhere on the scroll bar except on the arrows or the elevator. |
Working in many documents at once
Word 2007 Tutorial: You can work on more than one document at the same time. This can be a lot of fun, but even sometimes confusing.When you open a new document, a new button is placed on the Taskbar. To go from one document to another, click its taskbar button.
And if you want to see all open documents at once, click the View tab ► Arrange All. To go from one document to the next, either click in a new windowpane or press CTRL + F6.
To focus on one window when several are open, click the minimize button of the windowpanes you don’t want to see anymore. By doing so, you remove the other documents from the screen. Click the Restore button to enlarge the window, you want to work on, to full screen size. To see a window you minimized, click its taskbar button.
Zooming in or out
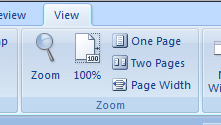
Word 2007 Tutorial: Eyes were not meant to stare at computer screens all day, which makes the Zoom command all the more valuable. You can use this command freely and often to enlarge or shrink the text on your screen and preserve your eyes for more important things, like gazing at the horizon.Zoom in or out using any of the following two ways:
| ♦ |
Click the View tab from the ribbon. Choose any one of the following: Zoom button: Choose the percentage at which you want to view the page. 100%: To view the page at 100%. One Page: To view only one page at a time. Two Pages: To View two pages at the same time. Page Width: To view the page at its width.
|
| ♦ |
This Zoom Control appears at the
bottom-right of the screen. Click the Plus button to increase (zoom in) the zoom percentage. Click the Minus button to decrease (zoom out) the zoom percentage. You can also drag the slider. Click the percentage shown to the right to open up the Zoom dialog box. |
|
|
Exiting Microsoft Office Word
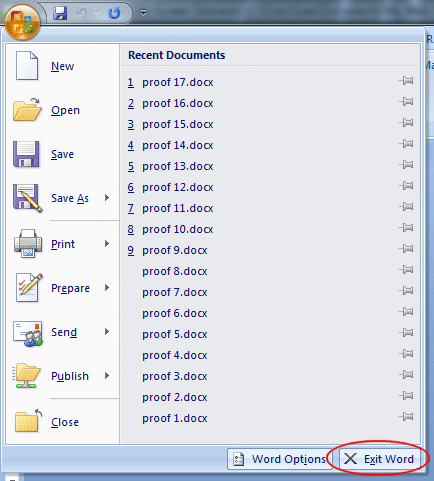
Word 2007 Tutorial: When it's time to say good-bye to Word 2007, save and close all your documents. Microsoft Word help with this task easily.To exit Microsoft Word, do one of the following:
| ♦ |
Click the Office button. (Top-left of
screen) Choose Exit Word. |
 |
|
| ♦ | Click the Close button on the right side of the title bar. |
|
|
|
| ♦ | Press ALT + F4. |
| Back to Microsoft Word 2007 from Word 2007 Tutorial : On-screen elements |
Microsoft Word 2007
TOPICS
- On-screen elements
- Save a file
- Open a file
- Rename a file
- Delete a file
- Select
- Undo/Redo
- Deleting
- Copy
- Move
- Format Painter
- Font Attributes
- Font Dialog Box
- Alignment
- Highlight text
- Character Spacing
- Indent
- Line Spacing
- Change Case
- Symbols
- Borders & Shading
- Download Borders
- Page Break
- Section Break
- Header
- Footer
- Page Number
- Margins
- Landscape/Portrait
- Vertical Alignment
- Paper Size
- Print
- Print Preview
- Thesaurus
- Spelling & Grammar
- AutoCorrect
