Word Wrap
|
|
|
|
|
|
|
|
|
|
|
|
|
|
Additional Resources
Word Wrap for Word XP |
 |
You can choose to wrap text around an object or let the text cover the object, the choices are almost endless.
|
|
What's on this page... Wrap text around a Drawing Object Wrap text around ClipArt Wrap text around Word Art |
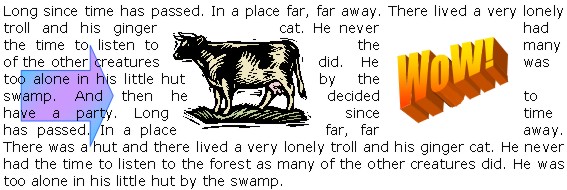 |
Text Wrap Around Objects
To wrap text around a drawing object, follow these steps:
| 1. | Double-click inside the drawing object, or right-click the object and choose "Format AutoShape". | ||
|
|||
|
|||
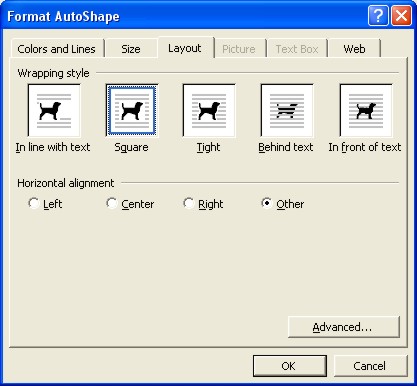
| 2. | Click the "Layout" tab. | ||
|
|||
| 3. | From the Wrapping Style
options, select the word wrap that you would like to use. Experiment with the different options. You can also choose to change the objects Horizontal Alignment. |
||
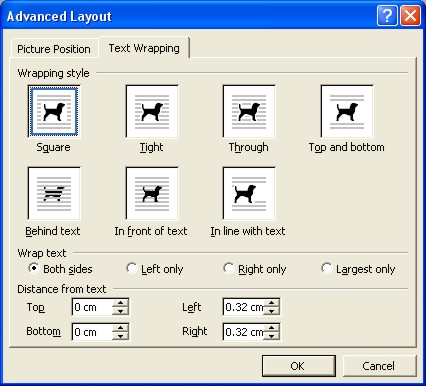
| 4. | Click the "Advanced" button for more options on Text Wrapping. | ||
|
|||
| 5. | From the Wrap text
options, select the kind of text wrapping you want. You can also change the "Distance from text" to more specific options. |
||
| 6. | Once you're done, click "OK" and click "OK" again, to return to your document | ||
Text Wrap Around ClipArt
To wrap text around Clip Art, follow these steps:
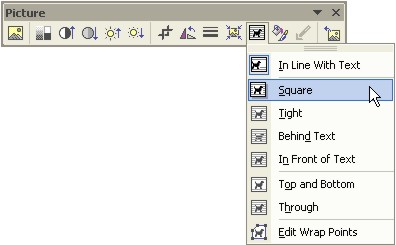
| 1. | Right-click the picture and choose "Format Picture". | ||
|
|||
|
|||
| 2. | Click the "Layout" tab. | ||
| 3. | From the Wrapping Style
options, select the word wrap that you would like to use. Experiment with the different options. You can also choose to change the objects Horizontal Alignment. |
||
| 4. | Click the "Advanced" button for more options on Text Wrapping. | ||
| 5. | From the Wrap text
options, select the kind of text wrapping you want. You can also change the "Distance from text" to more specific options. |
||
| 6. | Once you're done, click "OK" and click "OK" again, to return to your document. | ||
Text Wrap Around WordArt
To wrap text around WordArt, follow these steps:
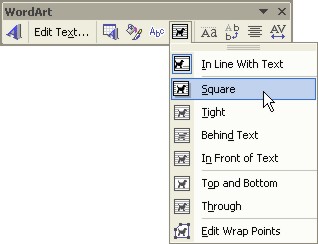
| 1. | Right-click the picture and choose "Format WordArt". | ||
|
|||
|
|||
| 2. | Click the "Layout" tab. | ||
| 3. | From the Wrapping Style
options, select the word wrap that you would like to use. Experiment with the different options. You can also choose to change the objects Horizontal Alignment. |
||
| 4. | Click the "Advanced" button for more options on Text Wrapping. | ||
| 5. | From the Wrap text
options, select the kind of text wrapping you want. You can also change the "Distance from text" to more specific options. |
||
| 6. | Once you're done, click "OK" and click "OK" again, to return to your document | ||
| Back to Top |
| Return to Microsoft Word XP from Word Wrap |
Microsoft Word XP
Q & A
Antonyms
AutoCorrect
AutoShapes & Text Boxes
Bookmarks
Borders
Bullets
Change Case
ClipArt
Columns
Convert PDF to Word
Convert Word to HTML
Convert Word to PDF
Customize Menus
Customize Shortcut keys
Customize Toolbars
Delete a File
Delete Text
Download Borders
Download Fonts
Drop Cap
Envelopes
Find & Replace
Fonts
Footers
Format Painter
Headers
Highlight Text
Indent
Labels
Line Spacing
Macros
Mail Merge
Margins
Move or Copy
Numbering
Open a File
Outline Numbering
Page Numbers
Page Orientation
Page/Section Break
Password
PDF to Word Converter
Print Preview
Rename a File
Save a File
Screen Layout
Selecting Text
Special Characters
Spelling & Grammar
Styles
Symbols
Synonyms
Tables
Tabs
Text Wrap
Thesaurus
Undo
Word Counter
Word to HTML Converter
Word to PDF Converter
WordArt
Zoom

